
The Bunnings Workshop community can help with your home improvement projects.
- Bunnings Workshop
- >
- Discussion
- >
- Outdoor
- >
- Re: Side yard reno - Outdoor entertainin...
Side yard reno - Outdoor entertaining area
- Subscribe to RSS Feed
- Mark Topic as New
- Mark Topic as Read
- Float this Topic for Current User
- Bookmark
- Subscribe
- Mute
- Printer Friendly Page
Share
- Mark as New
- Bookmark
- Subscribe
- Mute
- Subscribe to RSS Feed
- Highlight
- Report Inappropriate Content
Side yard reno - Outdoor entertaining area

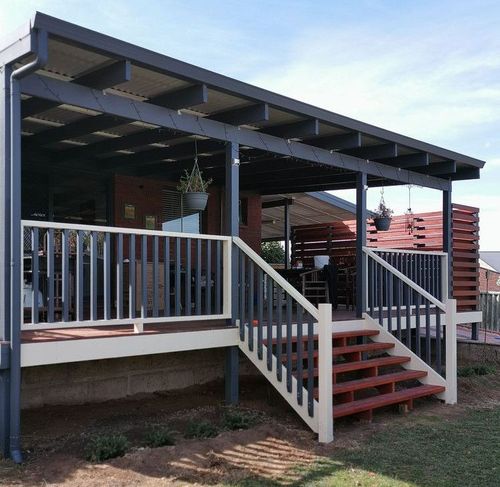
Built an extended outdoor entertaining area. A warm space that connects our dining, garage and backyard. Somewhere where we can relax, read, sip wine, and or have cold drinks soaking up the sun during summer, and still be able to utilise the space in winter.


Materials
* All materials from Bunnings
(Except recycled door, side table, lamp and Cheers sign).
* Spectrite Decking
* DIY Black Aluminium Shutters
* Treated Pine Wood (for structures)
* Treated Pine Timber Posts 100 x 100mm
* Cypress Pine Wood
* Cabot's Natural Decking Oil
* Cabot's Merbau Decking Stain
* High Strength Concrete
* Wood Brackets, Bolts, Nuts, Post Anchors Full Stirrups, Bearers and Joists
* Concrete Dynabolt
* 75mm Wood Screws
* 65mm Wood Screws
* 100mm Wood Screws
* 35mm Decking Screws
* 65 mm Decking Screws
* Decking Nails
* Skylite Roofing and Roofing Screws
* Concrete Charcoal Pavers
* Large Tuscan Path Pebbles
* Lytworx Party Lights Warm White
* Lytworx 240 Warm White Heavy Duty Fairy Lights
* Deck Lights
* Black Twin Head Exterior Wall Lights
* Outdoor Cable Ties and Clips (Black)
* Bamboo Screens
* Pull Handle Rectangle Matt Black
* Mimosa Malibu Daybed
* Mimosa Malibu Rectangle Coffee Table
* 160cm Oval Jute Rug (Natural)
Tools
* All tools from Bunnings
* Hammer
* Pliers
* Side Cutter
* Angle Grinder
* Electric Drill
* Impact Driver / Drill
* Battery Drill
* Electric Sanders
* Shovel / Wheelbarrow
* Ladder
* Drop Saw
* Handsaw
* Table Saw
* Chisel Crowbar
* Post Leveler
* Levelers
* Leveling Laser (Green) / Line Laser Levels
* Measuring Tape / Pencil
* Sandpaper
* Paint Equipment & Accessories
* Decking Stain Equipment & Accessories
Steps
Step 1
1. Plan, Design & Draft Drawings
* Completed draft designs and measurements of the project for approval and permission requirements.
* Dug required depth for posts and frames.
* Used concrete to secure posts and frames.
* Completed posts and frames.


Step 2
2. Decking & Stain
* Merbau decking and fence deck completed.
* Bamboo screen completed.
* First stain and oil applied.
* Pebbles and pavers added.
* Deck lights wired and installed.


Step 3
3. Roofing & DIY Aluminium Shutters
* We decided to close off the side yard so it's also accessible in the rain.
* Skylite Roofing & DIY Black Aluminium Shutters cut to required measurements, built, assembled and installed.


Step 4
4. Door
* We bought the door second hand from Gumtree to close off the side yard for safety purposes and block wind.
* Built frame around the door so that the door can fit as required with no spaces.


Step 5
5. Extension
* To make the space bigger and to create a seamless look, we decided to also deck the paved pebbles area.
* Built an extra deck seating area attached to the deck fence (built the deck seat to be removable and adjustable).


Step 6
6. Shelves & Small Cupboard
* We wanted to create an outdoor bar shelf and cupboard with chevron style cabinet doors. This was built to also hide the outdoor wires and electrical plugs.
* We re-used wood from a previous hutch we built for our pet rabbits. Therefore, made use of the hutch to lessen wastage and recycle wood where possible.
* Previous shelves re-positioned to extended area from Step 5.


Step 7
7. Stain & Paint
* Cleaned all the deck, as well as roof and structure posts.
* Sanded the deck where required.
* Painted posts, door and deck with merbau stain and oiled all the deck.
* The family all chipped in for this work.


Step 8
8. Lights
* Added more lights to brighten the area at night and so the space can also look more warmer and inviting.
* Fairy lights (heavy duty) also added to the extended deck area.


Step 9
9. Decor
* Assembled all the decor and laid out jute rug.


Step 10
10. Before & After Pics
* Progress to completion.


- Mark as New
- Bookmark
- Subscribe
- Mute
- Subscribe to RSS Feed
- Highlight
- Report Inappropriate Content
Re: Outdoor entertaining area in side yard
Thank you so much for sharing your beautiful outdoor haven! You've clearly put a lot of time and effort into this project, and it has definitely paid off. Your design skills are impressive, and I couldn't have imagined a side yard transforming in such a fantastic way. The thrifty door you chose fits perfectly and adds a special touch. This is such a lovely transformation, it may make it into one of our great Top Ideas articles like Top 10 most popular outdoor projects one day.
Cheers to many wonderful memories in your outdoor space.
Katie
- Mark as New
- Bookmark
- Subscribe
- Mute
- Subscribe to RSS Feed
- Highlight
- Report Inappropriate Content
Re: Outdoor entertaining area in side yard
Good afternoon @buildwithroneth
Loving that door! It really snapped the whole outside area together!  How long did it take to put together?
It definently would be a nice area to sit out in and relax!
Dave
- Mark as New
- Bookmark
- Subscribe
- Mute
- Subscribe to RSS Feed
- Highlight
- Report Inappropriate Content
Re: Outdoor entertaining area in side yard
Thank you so much @KatieC 😊
This project took a lot of time, effort and sweat to complete!
We're such at awe with this completion and admire all the projects we see in this forum!
We definitely know the efforts and hard work each DIY takes to complete and it's so amazing we have this Community to share, get ideas, help and tips!
We look forward to sharing more of our DIY projects.
- Mark as New
- Bookmark
- Subscribe
- Mute
- Subscribe to RSS Feed
- Highlight
- Report Inappropriate Content
Re: Outdoor entertaining area in side yard
Hi @Dave-1
Hope all is well. Thank you so much 😊
We were only able to work on this during weekends, so it took about 25 weekends in total to build (both a Saturday and Sunday).
We also had to wait in between after staining and oiling the deck (6-8 weeks) to let it weather and settle.
Approximately a year's worth of weekends 🙂
We just finally finished it with the addition of the chevron cupboards with shelves and added more fairy lights.
We're currently transforming our backyard too! It's now in the second year! Takes a while but it's so worth it when completed! As we work full time, we can only really work on our DIY projects on weekends 🙂
This is our progress of our backyard to date! We won't be able to finish this anytime soon, with the weather and all. Hopefully by April next year it should be completed.


- Mark as New
- Bookmark
- Subscribe
- Mute
- Subscribe to RSS Feed
- Highlight
- Report Inappropriate Content
Re: Side yard reno - Outdoor entertaining area
We absolutely love looking at this during night time! Love these additional fairy lights we hanged! Lytworx 240 Warm White Heavy Duty Fairy Lights. The added additional fairy lights as supposed to just having the Festoon lights has made such a huge difference in lighting! Feels like we’re always under a starry starry night 😊


- Mark as New
- Bookmark
- Subscribe
- Mute
- Subscribe to RSS Feed
- Highlight
- Report Inappropriate Content
Re: Side yard reno - Outdoor entertaining area
Hello @buildwithroneth,
Let me also extend my congratulations to you for completing such a terrific project. I hope you're enjoying your outdoor entertaining area, especially now that the weather is getting warmer.
How are you going with your backyard reno? Do let us know if you need a hand with anything. We'd be happy to assist.
Looking forward to seeing more of your work on the site.
Akanksha
- Mark as New
- Bookmark
- Subscribe
- Mute
- Subscribe to RSS Feed
- Highlight
- Report Inappropriate Content
Re: Side yard reno - Outdoor entertaining area
Hi @Akanksha
Thank you so much.
Apologies for the late reply. We’ve been away overseas and returned last month.
Backyard renovations going well. Slower than expected due to the weather being so unpredictable. We’d like to do a second coat for the modular walls installed-built and start to pressure wash our concrete. We’d also like to start the decking but undecided on the colour. Thinking about ash white? We have chosen an aluminium base structure for the decking and planning on a composite deck. Also currently designing the seating sectioned areas around the modular walls.
Some progress pics below. We will share more projects soon and as we finish each section of our backyard reno.


- Mark as New
- Bookmark
- Subscribe
- Mute
- Subscribe to RSS Feed
- Highlight
- Report Inappropriate Content
Re: Side yard reno - Outdoor entertaining area
- Mark as New
- Bookmark
- Subscribe
- Mute
- Subscribe to RSS Feed
- Highlight
- Report Inappropriate Content
Re: Side yard reno - Outdoor entertaining area
No worries at all, @buildwithroneth. Trust you had a wonderful time overseas.
Many thanks for sharing that update. All those projects definitely sound exciting. We look forward to seeing how you transform your backyard. Don't hesitate to reach out if you have any questions along the way.
Thanks again,
Akanksha
Why join the Bunnings Workshop community?
Workshop is a friendly place to learn, get ideas and find inspiration for your home improvement projects
You might also like


We would love to help with your project.
Join the Bunnings Workshop community today to ask questions and get advice.