
The Bunnings Workshop community can help with your home improvement projects.
- Bunnings Workshop
- >
- Discussion
- >
- Outdoor
- >
- Low-level Ekodeck build with prefab perg...
Low-level Ekodeck build with prefab pergola
- Subscribe to RSS Feed
- Mark Topic as New
- Mark Topic as Read
- Float this Topic for Current User
- Bookmark
- Subscribe
- Mute
- Printer Friendly Page
Share
- Mark as New
- Bookmark
- Subscribe
- Mute
- Subscribe to RSS Feed
- Highlight
- Report Inappropriate Content
Low-level Ekodeck build with prefab pergola
.jpg")
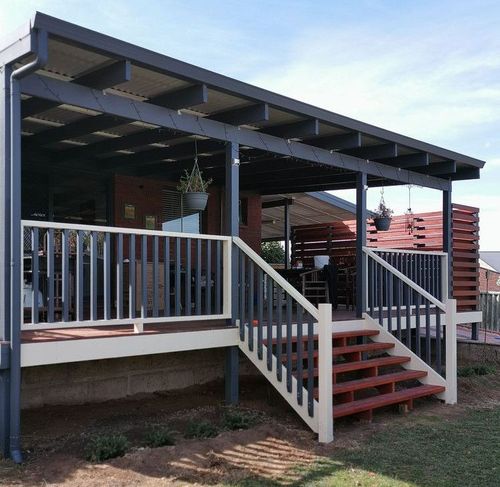
This deck was built on sloped ground with low gradual steps to provide easy access for the elderly homeowner. It used EkoDeck and features a prefabricated Saxony Gazebo from Bunnings.
Materials
- Saxony BBQ Gazebo
- Ekodeck Alpine Ash/Ironwood synthetic decking
- H3 Treated pine 140x45
- Pryda joist hanger screws
- Quickfix Kits
- Additional C Clips.
- Balustrading Kits
Tools
Steps
Step 1
I originally posted about three weeks ago with some questions about a frame for a low level deck - the job is now finished so I thought you might like to see the results - both the homeowner and myself are very happy with it!
All the materials used (with the exception of the Tasmanian Oak for the handrails) were purchased from Bunnings.
.jpg")
The homeowner had a large raised area in her backyard that was sloped but only accessiable by steep stairs made of retaining wall blocks. She wanted a small viewing deck up there, with a gazebo, that would be easy to access and low maintenance. So we decided to make a deck using Ekodeck Designer boards. These cost about $18 a metre, but are maintainance free and faster for me to install than traditional decking so you save a lot of time using them.
I wanted to make it as low as possible so use a single layer of 140x45 H3 for the structure, with posts set back from the edge to give it a floating appearence. There was a rise of about 850mm from the retaining wall stairs to the deck, which allowed for 4 steps rising 170mm each time.
The home owner wanted it to be about 3m x 3m. Since I wanted to minimise wastage of the expensive Ekodeck, I came up with the below framing design. The double blocked out edges allowed me to picture frame all around the deck. The double and centre beams had the posts under them as the supporting beams.

For this job I also had to remember that I was adding a gazebo - so additional noggins were required to make sure I could attach the gazebo through the deck to the framing for sufficient strength.
Also remember you'll need to have the decking overhang the frame by 25mm all around if you intend to add fascia boards to hide the frame.
Step 2
For single layer framing, I find it easier to build the frame first, prop it up to get it perfectly level, then hang the posts in holes and concrete it in. Here I've built the frame using nails as well as 150 and 175mm battern screws (hangers and angles will be used later to reinforce all joints). Note the weed mat and the posts hanging in holes. I painted the posts with bitumen to give them additional protection. The ratchet strap is to hold it perfectly square while concreting - galvanised strapping was later added during the reinforcing stage.
.jpg")
Step 3
One the concrete was poured, I added glavised brackets to reinforce the frame, diagonal strapping to keep it all square, and joist hangers where appropriate. I also painted the rest of the frame black, as it looks much better with the ekodeck than naked timber underneath.
The orange screws are Pryda joist hanger screws - much faster and easier than nailing in the hangers!
.jpg")
.jpg")
.jpg")
Step 4
I then built the rising stairs - really these are like four minidecks and constructed with the same principles as the main deck. Since I had a rise of 170mm each step, the 140mm framing needed 30mm spacers in between each step.
The steps had to change direction 45 degrees to meet with the pre-existing retaining wall steps. Thankfully my mitre saw made the fiddly angle cuts a breeze.
.jpg")
As you can see, each step is supported at the front with a concreted in 90x90 post. I usually put posts under the framing for better support, but it wasnt practical for these stairs. So I later reinforced with plenty of M12 bolts.
Before adding decking, I covered the weedmat with gravel to prevent it flapping in the wind, as well as reducing splashup in rain.
Step 5
.jpg")
Then it was time to lay down the decking. Since Ekodeck expands with heat laterally, you need to have 6mm expansion gaps at all ends - which can get a bit fiddly with the mitres on the dark picture framing. One thing to note if you want to do this - the EkoDeck Edge Boards are held down with hidden C-clips (you'll know what I mean if you use them). The Quickfix Kits that Bunning sells contain no where near enough C-clips - 14 are provided, but I needed something like 70 for the picture framing. Thankfully you can buy them separately.
Step 6
.jpg")
The Saxony Gazebo was easy to build, taking me a day solo, including giving it a coat of marine varnish. It includes 50mm concrete screws if you are fixing it to a slab, but I used 100mm battern screws to fix the steel feet through the deck into the framing, making sure it wont be going anywhere!
Step 7
.jpg")
Then it was time for the last step, adding in the handrails. These are not required by code as the deck is less than 1m high, however the elderly homeowner requrested them for ease of access.
Because the stonework early had been done, I had to use post brackets to on the first rail to support them. The brackets have a little flex in them when not supported otherwise, so I connected them directly to framing where possible (note the lateral bolt going into the wall halfway up the first post for extra strength). The stainless steel ballustrading wire was not required by code, but is a nice addition.
The last handrail was connected directly to the deck frame with M12 bolts.
Step 8
.jpg")
And she's done, ready for the landscapers to come in and plant around it! Thanks for the guidance and help I've received from these forums in the past and I hope this post helps someone else down the way.
- Mark as New
- Bookmark
- Subscribe
- Mute
- Subscribe to RSS Feed
- Highlight
- Report Inappropriate Content
Re: Low Level EkoDeck Build with prefab Pergola
Amazing work, @jase2!
The deck and staircase turned out really well. I love the use of Ekodeck as it's low-maintenance and will last a long time. The design is well-thought-out, especially the gradual steps. I trust our members will appreciate you sharing the process and steps, as they are very helpful and informative. It's clear that you put a lot of effort and attention to detail into the project. Overall, a job well done!
Many thanks for sharing, and I look forward to seeing what project you tackle next.
Mitchell
- Mark as New
- Bookmark
- Subscribe
- Mute
- Subscribe to RSS Feed
- Highlight
- Report Inappropriate Content
Re: Low-level EkoDeck build with prefab pergola
Man, I like your attention to detail! Love future proofing projects and you certainly did that. I wouldnt have thought to put a weedmat down and gravel on top! Maybe would have tarred the posts... maybe  Definently you have given some pre thought for afterwards in longetivity. I had half considered to do the split decking as you have done it at home (I have a sloping block) but went with pavers. Think I should have gone with the split decking!
Dave
- Mark as New
- Bookmark
- Subscribe
- Mute
- Subscribe to RSS Feed
- Highlight
- Report Inappropriate Content
Re: Low-level EkoDeck build with prefab pergola
@jase2 Amazing !! Looks great. Can’t wait to see the landscaping done around it. This would be beautiful for Wedding photography !!
- Mark as New
- Bookmark
- Subscribe
- Mute
- Subscribe to RSS Feed
- Highlight
- Report Inappropriate Content
Re: Low Level EkoDeck Build with prefab Pergola
Thanks Mitchell - much appreciated, and thanks for your help during the planning phase.
- Mark as New
- Bookmark
- Subscribe
- Mute
- Subscribe to RSS Feed
- Highlight
- Report Inappropriate Content
Re: Low-level EkoDeck build with prefab pergola
Thanks Dave! I did bitumen the posts in step 2 It was H4 post timbers but I reckon its a good bit of extra protection (especially endgrain) for very little effort
- Mark as New
- Bookmark
- Subscribe
- Mute
- Subscribe to RSS Feed
- Highlight
- Report Inappropriate Content
Re: Low-level EkoDeck build with prefab pergola
Why join the Bunnings Workshop community?
Workshop is a friendly place to learn, get ideas and find inspiration for your home improvement projects
You might also like


We would love to help with your project.
Join the Bunnings Workshop community today to ask questions and get advice.