
The Bunnings Workshop community can help with your home improvement projects.
- Bunnings Workshop
- >
- Discussion
- >
- Kitchen
- >
- Re: Kitchen Build from 2009
Kitchen rebuild from 2009
- Subscribe to RSS Feed
- Mark Topic as New
- Mark Topic as Read
- Float this Topic for Current User
- Bookmark
- Subscribe
- Mute
- Printer Friendly Page
Share
- Mark as New
- Bookmark
- Subscribe
- Mute
- Subscribe to RSS Feed
- Highlight
- Report Inappropriate Content
Kitchen rebuild from 2009

This is an old Kitchen rebuild project from 2009 I have Ummed and ahhed about posting it as the photo quality isnt the best. But decided if it helps showcase the steps for a full kitchen rebuild then why not 
The previous kitchen was a 70's themed one that was all particle board and built in place.
The underlay of the lino in the kitchen was masonite and heavy duty staples...
The underlay in the dining room was a rubber fuzzy type deal that was glued to the floor.
Materials
Mmmm Thinking wayyyy back
Kaboodle Cabinets and associated parts all from Bunnings
Stove was an Omega (picked it up on special)
Paint Olive green (forget the brand, tho prob Dulux)
Paint Celery green (forget the brand, tho prob Dulux)
Plastic sheet paint protector
New two bowl Sink from Bunnings
Ceaser Stone Benchtop 20mm thick (ish)
Tools
Broom
Sledge Hammer
Cold chisel
Hammer
Chisel
Paint scraper
Ozioto Drill
Gorilla stand
Steps
Step 1
The project took around 3 and a half months, There was some waiting times amongs that for things like the Stone Benchtop install and Plumbing plus sanding and varnishing the floor. I thought it went along pretty smoothly and in a timely manner.
Too many take away meals and breakfasts cooked on a little double hotplate in the loungeroom is something I do remember
I do remember trying to revist everything that we had in the kitchen and deciding if it was needed in the new kitchen. I did loose that battle lol Why build cupborads for stuff we never use was my way of thinking.

The Dining room was merged with the kitchen to give a continuence and also create space and storage.

Yes... It was a kitchen from 2009 Well a kitchen from the 70's

The carpet was interesting, One reason I liked the housewas you could see underneath it and it was all floorboards.

The felt underlay was a surprise as it did not want to come up easily, this is just the fuzz that was left. The sanders told me it "wouldnt be a problem" and they were correct!

The main question was how to have a kitchen in use and pull it apart at the same time... And also remember to remove the tacks from the edges of the old capeted area.

Floorboards, I think They were cyprus pine. The black dots all over the floor are heavy duty staples to hold the masonite in place.

It was painful removing all the staples. Did it but there were a LOT.

Empty Kitchen! Time to remove it.

Removing that one overhead glass cabinet really gave space to the overall room.
Step 2
Removing the tiles was the next step, I remember not looking forward to that as I was concerned about damaging the plaster (yeah insert laughter at this point)

20mins into the job and already multiple holes... The tiles were secure!

Tools that worked best were the cold chisel or the paint scraper to remove but both still ended up breaking the plaster.

Gave up caring at this point as i knew I would have to replace it anyway.

Tiles gone, cupboards gone...

Other side

Always the go to tools...

Main tools for dismantling....

No way could I carry the oven/stove out so dismantled it to make it easier to carry downstairs.

It felt really nice removing the old kitchem...

Note the mess of glue/backing on the wall from the tiles...

Yep, thats the outside wall  Brick veneer is exactly that.

The missing plaster on the right was an "oops" while trying to leaver out the plaster next to it...

I bought "patches" to fix the holes.. I thought this was the easiest as they fitted into the car.

Afterwards I was kicking myself, a new sheet across the width would have been a whole lot less effort.

This was a different material, I wasnt sure what it was so it stayed.

Ready to be repaired.

As you can see I hadnt cut plaster before... I used a hacksaw blade! Fast forward a decade and I scour the line with a knife and "snap" It works a charm...

Patching away... Must admit I was happy with my skill level at that point.

Temporary making safe the powerpoint (yes I am a sparky ) The rear was wrapped in tape so nothing could be touched.

Patchwork quilt comes to mind....

Another hole made for the power for the stove to come up. I didnt want it to come through the floor as that would be dodgy and also if I ever move the stove it could be problematic so through the wall it was. I couldnt drill from underneath due to the way the wall was constructed so I had to cut a hole for the body of the drill to fit in and then cut some more as it wouldnt quiet fit...
Step 3
There was a lot of sanding in bringing the patches I had done back to feeling smooth, I should have used more mud over a wider area to really help feather it in. This was my first plastering experience.

Was cursing at having to cut another hole...

You cant see it but I had repaired the hole from the old exhaust fan for the kitchen. Overhead sanding is hard work. Prepping for the undercoat of the rooms.

Ahhh The "repair" Not my greatest work I must admit. I did eventually get it almost smooth. Same rule as before, more mud/plaster over a wider area when joining and that way you dont get that ridge effect.

Covering the windows so paint dosnt get on them.... Looking back what was I thinking!

First coat... I had the 1000W Hallogen light keeping the place warm as it was winter while we were working... Not such a great idea having the room sealed up the way I did as the humidy went high, the paint actually dripped overnight and the next day it felt and looked like a mess!

Dont look too closely 😕

Second coat covered a lot of the issues up after sanding the drip lines. Yes I was kicking myself. Rushing a job and also sealing the room tight with the heater/light going was the cause. We were having a party in a few weeks and wanted it done before hand.


Could still see the faint outlines of the old paint job...

The paints name is "Olive Green"

Better showing of the Olive green and the Celery Green that we used for the sink/window wall. I trully cannot remember why the two colours were chosen, all I remember is the 3 hr discussion the night before and the 2 hr discussion of colours at Bunnings the next day... lol

The lines are actually shadows.. Even tho it looks like discolurations

I think the darker colurs were chosen to give seperation to the cooking kitchen and the dining kitchen feel.


Looking back "What were we thinking!" lol Tho it was all the rage back 2009


Final coat, so thats 4 coats all up just to remove that brown paint...


Second coat removed all the lines.

I really didnt mind the two shades of green, it made it less intense as well as giving that "pop" of colour.


Things I wouldnt do again, Seal the windows up so much with the plastic, I would just cut the paint in and maybe tape/paper the edge of the timber instead. Also Not to paint at 11pm at night in mid winter. The paint wont dry easily.
Step 4
Time for the floors to be sanded back and polished.

From memory it was a polyurethane and the colour was as light as I could go.

It was so strong in the house I would recomend stay away for the weekend after the varnishing. It was eye watering


The window sills that went going to be done were bumped up the list once I realised that "contact" had been put over the rough timber... (You know the stuff you put on books? Yeah that stuff)

Sanded! It was a lot of effort but worth it. The original style of the windows when they went in had a real rough textured look.

Putting the flatpacks together.

First one done, The instructions were simple, as long as I followed them it went smoothly. As soon as I "knew better and presumed" things did not match up

I do remember the whole flatpack for the corners was heavy to carry up a flight of stairs...

I was really surprised how easily they went together. I used my power drill on low and went slow (The torqued scew drivers were still away off back then) I also just used a large phillips head screwdriver...

Corner units done!

New Skirting board

Time for the draw rails to be installed. It went really easily, The instructions were comprehensive.

So many draws to put together, In the end it was just a production line. "So many screws" is a quote from when I was installing them lol

Starting to run out of room

The adjustable feet were amazing. It was one thing I was worried about as in "How do I get it all the same height?" Do I need to worry about a particular height? what is covered by the bottom ? In the end the feet are large screws really, and infintly adjustable by hand, the "kick board" could be cut to size and the height of the bench was a standard height.

Joining the Carcasses together. It really becomes a complete solid set at this point. The cupboards had all been leveled before hand.

There are "spaces" that could be used to fill in the 20mm/40mm diffence in the width of the room. Surprisingly I found out that standard rooms are standard sizes and the kaboodle cupboards are standarsd sizing that all fits together so nicely. Sounds simple but I was stressed up until that point.

You can see that thin gap between the middle Carcass and the corner unit on the right, I put a 20mm spacer in there and left 5mm either side of the corner units against the wall. It was at this point I realised that walls are not square to each other or even true vertical sometimes

Dining room cabinets going in.

So many flatpacks to put together.

The sink cupboard going in. It fitted nicely.
Thinks to note tho. When you buy a sink remember to figure if it will "sit" inside the cabinet nicely, if the edge will be to close to the timber support and the weight of the sink/benchtop is ok. I had to modify that front rail and put in a small piece that was vertical to it to give it an L shape for added support.

Matching all the holes was a lesson in maths....

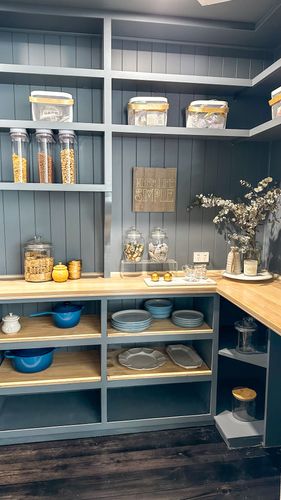
Where do you store the shells until you are ready?...

So close I just wanted to work faster

The gap between them is where the Oven will fit.

For all the fancy dinner plates and tupperware that dosnt get used often....

Extremely happy with myself.

Could really feel the "shape" the area was turning into.
Step 5
Time for the Benchtops to be installed. We chose Ceaser Stone, an engineered product. It was almost half of what the whole kitchen cost to do. $3500 I think it was.

The fitters working out the cuts for the sink.

I was really happy with how the company worked and how it looked. They were surpprised that I had it so level, I think It was out 3mm side to side all up which was ok. My mind went from its level with my little 1m level and they brought in a 2.4m level.... hahahah I went Ohhhh . Lucky for me I had spent a lot of time getting it right.


Yes they were cheeky but they knew their stuff.

level...

Seriously was so happy with the bench. The offcut they smoothed and gave to us as well.

The dining room side matched the kitchen side.

Next step will be the draws and doors...


I spent a long time putting things together, well maybe not weeks but days...


The doors went easily in, they "clicked" and were in. The adjustment then took a little to figure out and from that point on it was easy. Ask me today which screw does what I wont remember but doing a whole kitchen you remember at the time

The doors went on very easily.

Really starting to flesh the kitchen out

Was feeling very happy with myself until.. those draws...

Very happy with it....

Learning curve moment number 3? 4? The draw faces I should have done before the benchtop went in, at least it would have been easier that is. The draw rails are all pre marked ect so no problems. The draw "faces" tho wernt... How do you make sure the face is square to the cupboard and also the draw below, you use clamps. 1st draw, second, third no problem and then you get to the top... You cant use a clamp as the bench top is in the way.... Back to using good old maths to figure out where what fits..

The coins I used as spacers. It worked really well.

My jig I made to keep all the handles in the same place as well as have the draw face in the right place.

If you look just under the sink you will see my strengthing modification to carry the load of the stone bench plus sink plus someone leaning against it. If we had gone for thicker stone then it probarly wouldnt be needed.

All done... Well the bottom part that is..

Pretty happy with how it looks.

No kickboards yet

It made for a seemless area.

Was pretty happy with the oven, the old ones grill never worked so I was looking forward to cooking with this.

The oven really fitted in nicely with the benches, I made sure that the waterfall edges were in with a 10mm space each side.

Sink all plumbed in and working nicely.

Because we had gone so close to the edge of the cavity space putting in the little clasps that hold the sink down in place was fiddly but do-able. It just took awhile to get them in.
Step 6
Time for the top cupboards to be done... I was nervous at this part as "How do you hold the cupboards up so they are level and also three at at time? I knew there was "lifters" you could buy but they were pricey and $120ea I think from memory... I figured away around them as I am sure others had done the same thing.

Next batch of flatpacks being assembled. We were running out of money so the stress was building up to get it finished.

The solution to how to keep the cupboards level while installing them.... A flat piece of timber screwed into the studs behind the plaster. And yes I knew were the studs were as I had made sure to leave pencil marks up top from when I did the replastering of the wall.

The rail is level

Carcass made, time to mount them in place. I placed them up, Friends held it pressure wise against the wall and I screwed through the backplane of the cupboard into the studs.

First one done... Cheering in my head with sweat on my brow!

Second one ready to go...

Oh yeah... feeling happy with myself

Two is in!

Three is in! Number two and number three were upside down..... Didnt realise it until I took away the timber strip and you could see the rough back edge of the carcuss

I had a mate comment and say the house was designed for the kaboodle cupborads Here is my reply
"I actually think that most kitchens will work out as the cupboards come in a range of sizes, we were lucky that its 2720mm across (now how come i can rem that! lol) but those two cupboards on the right are upside down! the very back panel has one smooth edge and should be underneath! lol its on top and nope not changing it! going to have a strip lighting there anyway but man felt stupid after we took the rail away!"

Feeling happy no matter what even tho out of the four shells I only had one the right way up first time lol

Almost done, doors and shelves are all thats left.


Fixing the doors in place.

The frosted glass look was all the rage in 2009, I was intending to put lights inside but decided against it as you could still see stuff in normal light anyway.

Almost back to being a fully functional kitchen...

Time to bring back the clutter that makes the kitchen your own.

Perfect use for the offcut stone.

Kitchen back in service and cupboards filling up...

I was really happy with how it all worked out. Total strip down and build time was three and a half months which felt like ages but looking back it was fast.
I never got around to installing the kickboards, or finishing the new hole for the exhaust fan and replacing the overhead fan before we sold the house. The exhaust fan only needed a hole cut as it was cabled ready to go.
Some reasoning behind doing all the floor and painting all the walls. I figured if we ever changed the layout or decided to remove part of the kitchen it would be wise for everything to be the same underneath. Especially the floor.
Things I would change, Less clutter old items that never get used again would be left out Painting in the middle of the night, and One sheet of plaster instead of multiple sheets.
- Mark as New
- Bookmark
- Subscribe
- Mute
- Subscribe to RSS Feed
- Highlight
- Report Inappropriate Content
Re: Kitchen Build from 2009
Hi @Dave-1
That kitchen looks awesome! Your assembly technique for the wall cabinets was really clever. I may have to borrow that technique when the time comes for me to renew the kitchen.
Thanks for sharing such a wonderful project.
Eric
- Mark as New
- Bookmark
- Subscribe
- Mute
- Subscribe to RSS Feed
- Highlight
- Report Inappropriate Content
Re: Kitchen Build from 2009
Thank you for sharing this. I am lost and overwhelmed when it comes to my kitchen and this was very inspiring.
- Mark as New
- Bookmark
- Subscribe
- Mute
- Subscribe to RSS Feed
- Highlight
- Report Inappropriate Content
Re: Kitchen Build from 2009
Evening @Lease
Thank you
Step by step is how I get through the scary parts of the project.
Break it down to a smaller chunk for every roadblock you think of.
And ask us So many in here have done kitchens or part kitchens or even Laundrys and mudrooms
They use to supply graph paper with the Kaboodle kitchens, nowadays I think its something else. Take a old note pad with you to coffee and start off with a list of things you would like in your kitchen, then a list of kitchen machines you have. Pretty soon you will know what you need. Then day dream sketch, dosnt have to be exact or even fit but just picture in your mind.
Ikea (shhhhh) have good looking kitchens to wander through as well Bunnings do have nice ones but its nice to compare. Or find a housing display village near you I have done that before and the best part is they are on trend for sure!
Dave
- Mark as New
- Bookmark
- Subscribe
- Mute
- Subscribe to RSS Feed
- Highlight
- Report Inappropriate Content
Re: Kitchen Build from 2009
Thank you @EricL
I was telling my sister about the project today and commenting that it looks a little dated in the photos She reminded me that it "looked awesome" when I had finished it
I would change a few things in the way I would design a kitchen now... Might get to start it this year even or maybe next year. Definently looking forward to it tho.
Dave
- Mark as New
- Bookmark
- Subscribe
- Mute
- Subscribe to RSS Feed
- Highlight
- Report Inappropriate Content
Re: Kitchen Build from 2009
Hello @Lease
Welcome to the Bunnings Workshop community. It's sensational to have you join us.
It's great that you found @Dave-1's kitchen project inspirational. Are you planning on a kitchen renovation yourself? If you are, please don't forget to post photo updates of your project. I'm sure our members will be keen to see how you'll be updating your kitchen.
Eric
Why join the Bunnings Workshop community?
Workshop is a friendly place to learn, get ideas and find inspiration for your home improvement projects
You might also like


We would love to help with your project.
Join the Bunnings Workshop community today to ask questions and get advice.