
The Bunnings Workshop community can help with your home improvement projects.
- Bunnings Workshop
- >
- Discussion
- >
- Outdoor
- >
- Re: Pool deck stage 1
Pool deck stage 1
- Subscribe to RSS Feed
- Mark Topic as New
- Mark Topic as Read
- Float this Topic for Current User
- Bookmark
- Subscribe
- Mute
- Printer Friendly Page
Share
- Mark as New
- Bookmark
- Subscribe
- Mute
- Subscribe to RSS Feed
- Highlight
- Report Inappropriate Content
Pool deck stage 1

The old gazebo next to the pool had reached end of life years before I bought the house. It couldnt be walked on and needed to be removed to make the area safe at the very least. I wanted a deck beside the pool and had some ideas in my head that had not solidified into anything really. Pulling the old deck down had me thinking of ways forward.
This was at the end of 2011.
The concrete stirrups went in from June 2012
The timber posts went in Jan 2013
The timber flat deck finsihed July 2013
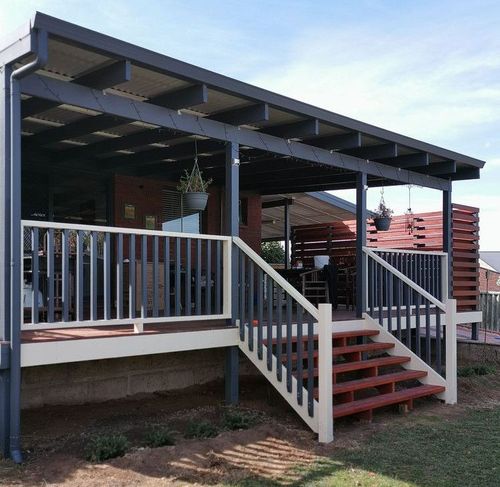
Stage two is the privacy screen and the roof.
Stage three is yet to be done (2023)
I used Jarrah for the privacy screen and cannot remember the type of hardwood I used for the floor.
Materials
Recyled timber for joists
Recyled timber for posts
36 bags of Concrete (man thats a LOT looking back)
600mm Stirrup posts
3" Flat head nails
Chipboard screws (thats what the box says but the timber deck place recomended them)
Tools
Circular saw
Flat head shovel (Cyclone)
mallet
G clamps
Claw hammer
Large flathead screwdriver
Steps
Step 1
First steps were to removethe old gazebo. Once I started removing the sides and floorboards I was shocked at the state it was in. I was hugely shocked to find that the whole structure was supported on 4 steel pipe posts and then on just 75*45 joists... (Shaking my head)

Old Gazebo

Well and trully past end of life.

The underside with a couple of posts that rested on the ground.

Removed and it really opened up the side yard.

Why do people always hide/leave rubbish underneath structures. It will come back to haunt someone.

Ahh yes the supporting structure...

Just a little bit of sag in the old floor...

Now I know why I was told "dont walk on it"

It was a pleasure to remove, hard work but I felt so much better afterwards.

The stirrups I will use for the 500mm deep holes for the new posts plus my new shovel  That Shovel is still going strong 11 years later!

If you look closely you can see the stringline that is showing the new edge of the deck I want. I went through a few different iterations while dismantling the old one. My sketch pad really helped me work out what I wanted and how much quantity wise I needed.
Step 2
The next stage was to start digging the 16 post holes I would need. Only two issues came up. One the deck would be over the grease trap drop off point (and yeah Ive had to clean that out twice since) but managed to factor that in and the other issue was the post next to the foundaion of the house had to be moved a little so I could dig the proper depth hole.

Just checking the depth of the hole against the post

I really didnt want posts next to the retaining wall of the pool. I also didnt want to attach the timber to the brickwork as the old pergola had been. I think it really helped the old timber to rot.

Happy with the depth.

16 holes later....

4 lots of 8 bags. Two bags of concrete per hole....

Lining up all the stirrups so they would be in a straight line, I wasnt particulary worried about the height of the above ground part of the post as long as 450mm at least was in concrete.

All lined up, was stressing like crazy as this was the first time I had used concrete anywhere and also the first time lining up posts in the same plane.

The cheapest wheelbarrow from Bunnings lol You do get what you pay for.... It lasted through the whole job until the second last bag I dropped into it and heard a loud "CRACK" It still worked but leaked from a 50c piece of plastic hole 

Hard fast work as I was worried that the concrete would go off easily. Looking back I was a nubie

I just kept doing the next four and then the next..

This was the post with the issue of being next to the foundation. I worked around it.

All done! Tho I need to buy a grinder to chop off those old steel posts.

Old steel posts are gone!

I found these at a local recyling yard. Sad to say the recyling yard has gone now but I bought most of the timber for the deck from them.

Just laying out the timber to get an idea in my head of how it would look. In reality I was nervous about starting the posts and chopping up the timber.

The posts were 100mm * 70mm? The 100mm had to be shaved down as the stirrups width was 95mm So another first with chiseling....

Just to show what I mean by the slight difference in timber sizing. I dare say if I used new timber it would have fitted straight up.

Once I had completed the first one, the rest came easily.

All the center posts were short as they didnt need to be the supports for the roof.

Outside posts being put into their sockets. I used other pieces as stays.

To help stop any swaying while I was installing them.

More chiseling and notching of the posts to support the joists.

I was feeling pretty happy with myself with the chiseling effort.

Slowly working my way through all of the posts.

These clamps rock, they have helped me out so many times when an extra pair of hands were needed.

Slowly being built up, the joists will go across these.

All the joists and bearers are in, they have lined up with the edge of the concrete of the pool so I was really happy.

A couple of the joists had to be shampford as the concrete edge of the pool was not level (I was surpprised but shouldnt have been) I attached the joists to the bearers with 3" flat head nails.

I predrilled the holes as it was hardwood.. It made life easier

But not so easy! I can still hear the ring of the hit of the hammer as the nail went into the timber, it went up in pitch the further it went in!

Decking has arrived! And for the life of me I cannot remember the type. I know I got it form Waxwood is all, the privacy screen was jarrah as I wanted the red colour and width of the timber.
Step 3
I used the 3" nails as spacers between the boards and then used G clamps to hold theboard straight (with the help of a mallet) before predrilling and countersinking the holes. Then just worked myway across the area. I made sure I staggered the boards and also kept in mind to place the screws the same way across the timber.

Lining up the first piece of timber to go down next to the concrete. I was a little nervous about getting it right and accomodating the slightly different levels.

It worked out, The first one took a little fiddling but then it was easy to roll through them.

Have to say the little green ozito drill absolutely rocked! I used it to put all the screws in for the deck and privacy screen and it worked a dream.

First days effort done! And yeah I would sit on it and just admire the timber lol

This is what I was refering to in keeping the screws inline. The same diagonal spacing except for when two pieces butted up next to each other. Tho looking at that maybe I should have kept them all straight? Mmmmm

Slowly moving across the framework.

Sometimes I had to come up with inventive ways to straighten the boards before screwngthem down. The nails are shown as spacing for between the timber pieces.

I had a lot of fun building the deck, stessful at times but so much fun overall.

Almost there! And now it was time to start stressing about how to do the edge and then the privacy screen.

Flat area all decked out!

Underside, really happy with the look.

It feels safe underneath even with all the weight above.

Notching the edge piece of timber to make it look pretty

Maybe not the right way but its how I figured to do it. It worked out pretty tidy.

It worked out great
Step 4
Now it was time to square the edge up and put the skirt on. I hadnt done anything like this before and definently hadnt done a join cut for a corner so was fairly nervous about making mistakes. I just told myself to go for it and if I had to buy more timber then thats the way it had to be!.

All the pieces of timber came past the edge that I wanted so it was a matter of putting down a straight line and cutting it with a circular saw.

Working it out, There is something about working with timber I find relaxing. I remember stressing over doing the straight cut all at once. It turned out to be easier then expected yet again.

And cut! The last piece I had to do by hand as the concrete wall was in the way of the circular saw. It felt so nice to have a straight edge.

Other way.

Because I was taking so long doing the job the timber colour had started to age and change. I really should have oiled it as I went. Or found time to do it 6 weeks after laying it each section.

The skirt is on!

Really happy with the edge. I can hear my internal cheering as I was surprised it had worked so easily!

I was supper happy with the corner cutting. I didnt have a drop saw back then so I would have angled the circular saws flat plane to get the angle right. Its not the best but was well above my expectations

Serioulsy loved that green ozito drill! It pretty much built most of the deck! (Borrowed from work even ) lol I did buy one afterwards of my own.

Supper happy with the straightness of it tho now I am trying to remember, did I have it mounted below the timber or inline? Think I will check it when I go home.
Stage 2 of the project will be the privacy screen and roofing.
Stage 3 maybe will be the 10 year maintenance of the deck
- Mark as New
- Bookmark
- Subscribe
- Mute
- Subscribe to RSS Feed
- Highlight
- Report Inappropriate Content
Re: Pool deck stage 1
Hello @Dave-1
Thank you so much for sharing your pool decking project. It looks awesome and I am in total agreement with you in doing the diagonal spacing of the screws as it adds extra stiffness to the assembly. The installation of new footings and posts is really inspirational. I'm so looking forward to seeing stage 2 of your project.
Eric
- Mark as New
- Bookmark
- Subscribe
- Mute
- Subscribe to RSS Feed
- Highlight
- Report Inappropriate Content
Re: Pool deck stage 1
Afternoon @EricL
Thank you and I was just starting to put the project together to post! In the next few weeks I am going to have a go at sanding back the decking as it has faded to that "grey" look. (Truth be told it had faded before I finished the project )
Dave
Why join the Bunnings Workshop community?
Workshop is a friendly place to learn, get ideas and find inspiration for your home improvement projects
You might also like


We would love to help with your project.
Join the Bunnings Workshop community today to ask questions and get advice.