
The Bunnings Workshop community can help with your home improvement projects.
- Bunnings Workshop
- >
- Discussion
- >
- Outdoor
- >
- Outside bench
Outside bench
- Subscribe to RSS Feed
- Mark Topic as New
- Mark Topic as Read
- Float this Topic for Current User
- Bookmark
- Subscribe
- Mute
- Printer Friendly Page
Share
- Mark as New
- Bookmark
- Subscribe
- Mute
- Subscribe to RSS Feed
- Highlight
- Report Inappropriate Content
Outside bench

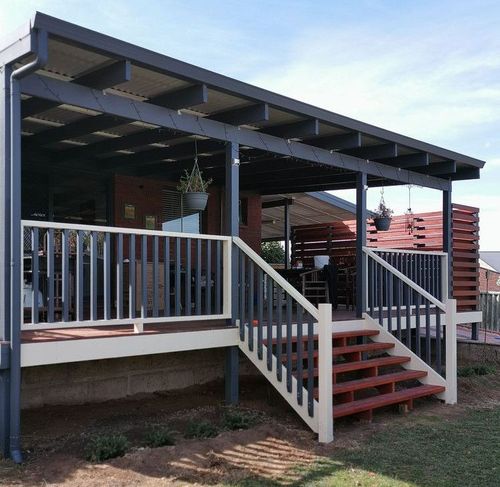
When i built the deck 12 years ago I wanted to install a bench here using the part ledge. Life takes over and it never started. Well Its restarted and finished now! The width of the concrete wasn't too large but enough for me to cantilever the bench out from the concrete slab. It really was an easy job, just getting it don before too much rain fell on the timber was my main concern.
Some things I had to factor in...
The posts are square to the pagolla/deck but not the concrete slab and house. (I maximised the space when I designed the deck is all)
The recycled timber I used for the posts has twists in it so the plain changes..
Materials
Yellow Stringybark decking 86mm * 19mm
Pine Structural 90 * 35mm Blue H2
Decking screws Gal (Had them already)
Concrete Anchors 75mm long * 8mm
Angle brackets 1 hole by two holes
Hardie Plank 500mm 8 2.4m
5mm yellow spacers
Soap (for dragging the screws through before putting them into the timber)
Cabots decking oil
Tools
Makita Hammer drill
Ozito torqued drill
Countersink tool for deck screws (yellow)
Spanners
Makita Drop saw
Hand saw
Chisel 30mm
Mallet
Steps
Step 1
I had just finished redoing the deck and privacy screen (will be in another project  ) I wanted to have all the jobs "not completed" or in limbo finished... This had now become the longest outstanding job to finish, only 12 years in limbo
I was lucky to find some yellow stringy bark on special at end of run from my local Bunnings. I was hopping it would be enough for the two projects that I wanted to do (It was almost!).

Yeah It was a bit messy...

I wanted the area to be useful and figured it would be perfect for a cantilevered bench.

First sketch idea, It really helps me to solidify how to, and what will be needed. Let alone if its doable.

Second sketch Idea, with more settling in of measurements.

Angled brackets going in.

Yeah I used the wrong concrete screws  hahahah They should have been gal screws, The gold ones are for interior (found out afterwards when I hit up a Bunnings staff member for another item Not worried,

Three rails was what I figured would be fine, I had calculated the height from deck to top of ledge, plus bracket + rail + crossbeam + bench top so it would feel comfortable to stand at. (I cheated and ran around the house measuring all the tables and benches heights

I used a piece as a spacer to get the height I wanted, worked a dream.

Pre-drilling the holes for the rails as I knew it would be a pain in a few spots. Oh and keeping the drill vertical as I wanted straight holes as I had miss bought the size bolts I was using so had no tolerance for it being out.

Lying things out and making sure the bed was level.

Level!

With the tight space I was working with I had to work out if the backing posts that were going to be attached to the crossbeam first would work. The vertical piece is for me spatially setting in my mind that it would work.

What can be better then finding the timber you like...

It can be on special! 

Cutting up the rails. I wasnt worried about this being H2 timber as its undercover (mostly)

Lining it up and realising, how do I attach the rails to the crossbeams?... I was going to use roofing ties and was confused about do I need two, one for each side? So I asked a Bunnings staff and he helped me out...Then he casually says "Why dont you use some timber off cuts... The light bulb went off lol I was making it way to complicated!

Solution! It worked perfectly.

Spacer block used again...
Step 2
Once one bracket was done it was easy to replicate the rest.

First cantilever done

Backing rail all sorted, had to make sure it lined up so the posts wouldnt run into the brackets.

The rear rail is in! Solid feel to it which was the only concern I had.

Front rail done, all attached to their supports.

I chose to use all the small off cuts up. It was end of run and I bought all that was left so wanted to maximise what I could do. Hence the skirt being put on first and then the slats would be inside the skirt.

I didnt want to mark the timber and have lost the "shoes" for the clamps over the years.

Skirt looking good, had to shave off a little of the right hand post due to the closeness.

Bench slats going in

Was feeling good, getting nervous as I knew that post at the far end I would have to work around...

The slats are the same width as the crossbeams, except I made the middle slats between the posts a little longer to help support the Hardie plank when pushed.

Pretty happy with the corner... In fact Very happy

Not so happy lol But still reasonably happy. I measured a few times and still dont know what I did. I didnt really have spare pieces as I was keeping the longest for the next project.

Putting the ends on here wasnt something I had factored in, I managed it but woooo.

Keeping the timber dry from rain, Have to say those Telstra stands/horses ( Saw horses (Upcycled Telstra installation stands) really are handy!

Next day and back to it,

I decided to screw flat timber to either side of the post to give support to the slats.

If you look closely you can see a twist to the timber post.. The advantages of recycled timber, the disadvantages as it may not be so straight...

Making sure the support pieces were the same level as the rails inside the bench.

Happy!

Was a pain screwing them in tho as I had very little room for the Ozito torqued drill

Lining up to cut an angled notch and chisel it out...

When you only have two hands, use the post to hold the timber....

Feeling pretty pleased with myself over my solution...

Yep, all cut...

Arghhh Can you hear the scream? I messed up...

Next piece I tried, measured and checked multiple times...

Cutting slots again and chiseling/scraping smooth the surface

Better! Not perfect but happy enough

Closer shot.

Other side done, Was very happy to move on past this post... One reason I didnt screw to the post side was any movement I didnt want to transfer straight to the bench. I probably should have left a little more gap but the post dosnt really move at all (been there 12 years)

I was thinking should I sand the post but decided I like the grey look so left it.

Almost done! It flowed pretty nicely except for the jiggling neat the left post. (The storm water pipe was smashed before the deck was built by a falling post from the wind Just in case you are wondering)
Step 3
Now for the backing, I wanted a concrete style backing that I can "Switch" if I want, I had the idea to be able to slide the panel in and out to replace or change it up. I think the Bunnings community members think alike! As I have seen the idea already since I was building it

Beat the rain... Just!

Need to do the flashing overhead..

testing to see how it would look, It was way cheaper then the concrete style panel I wanted, something like $120.00 to $195.00 compared to the Hardie plank for $16.60 That I went with.

Side profile

Extra long center pieces so there would be base support for the sheet if something gets pushed against it.

To show what I mean by the middle slats being a little longer

I used these to space the top of each post and make level the cover strip. This was so I didnt have to drill through the Hardie sheet and can switch it out fairly easy if I wish.

The wastage Very Minimal really.

The leftovers, meant for my next project the seat/lounge on wheels.

All done bar the oiling and the skirt.

Yeah, it really needs a skirt to cover that pipe.

The Hardie plank, I probably will put a beading strip along the base. It will help protect it even tho it dosnt need it.

This was when I found out about the difference between gold and grey concrete anchors.... I needed to attach the timber strip to the side of the slab so I could hang the privacy screen section off it.

I took the photos to remind me of the size of holes to drill ect, always handy to do when you are in store. Tho I just realised I could look up the item afterwards and look at the specification sheet


I had some left over from re-oiling the deck.

Not a lot but hoped I would have enough for the bench and the chair. (I did:) )

I was worried about getting oil on the Hardie board so came up with a solution. Worked a dream.

Better shot showing the Screen as well. Its just a fence extender panel re-used in a different way.

All done, the gap to the left is for access to under the house. I may fill it in with more screen when I do the area to the right of the bench. I was really happy with how the project turned out and how fast it went up. The skirt is held on by a strip of timber bolted to the slab, the screen is attached to the strip of timber by around 7 timber screws into that the H3 timber..
- Mark as New
- Bookmark
- Subscribe
- Mute
- Subscribe to RSS Feed
- Highlight
- Report Inappropriate Content
Re: Outside bench
Hi @Dave-1
That outside bench project looks fantastic! It is such a sweet project because you got those boards on a fantastic deal. Using the Kirk boxes was a clever idea as well to keep the Hardie board safe from overpainting. That fence extender panel covers the bottom nicely. Will you be painting the Hardie board a different colour or will you leave it as is?
Thanks for sharing such a wonderful project.
Eric
- Mark as New
- Bookmark
- Subscribe
- Mute
- Subscribe to RSS Feed
- Highlight
- Report Inappropriate Content
Re: Outside bench
Evening @EricL
Thank you I do want to paint the hardie board tho not sure what colour, I am pretty sure I should seal it first? I was going to go for a white as the Bessa block wall around the pool is slated for painting I have removed all the yellow/cream paint you may see in some of the photos. So I am back to straight bessa blocks and need to prep them for painting. And its back to that sealer question
The Fence extender will wrap around the corner of the house (Once I remove the old vertical slats that are the skirt and paint the back of the house) and also extend that last two feet with the fence extender. I just ran out of money and also I have a bad habit of not completing projects as I keep starting new ones or extending the original project to something new. So didnt want to take another bite before I had it done.
Dave
Why join the Bunnings Workshop community?
Workshop is a friendly place to learn, get ideas and find inspiration for your home improvement projects
You might also like


We would love to help with your project.
Join the Bunnings Workshop community today to ask questions and get advice.