
The Bunnings Workshop community can help with your home improvement projects.
- Bunnings Workshop
- >
- Discussion
- >
- Outdoor
- >
- Re: Low-level deck and pergola project
Low-level deck and pergola project
- Subscribe to RSS Feed
- Mark Topic as New
- Mark Topic as Read
- Float this Topic for Current User
- Bookmark
- Subscribe
- Mute
- Printer Friendly Page
Share
- Mark as New
- Bookmark
- Subscribe
- Mute
- Subscribe to RSS Feed
- Highlight
- Report Inappropriate Content
Low-level deck and pergola project
Hi,

I am planning some decking and a pergola, I would like to know if I am required any planning or building permits for the following:
1: extend my decking area from my alfresco (which is situated on a slab) and extending outwards in 3 directions, adding approx. 18sqm to the current decking area, the new decking will require footings of course, and be attached to the existing bearers on the alfresco. so I was wondering how deep footings should be ideally, post holes will be 1117mm on centre along the length, and 900mm on centre on either side.
decking will be 7200mm long and 4500mm wide, with a 380mm wrap around on one side.
currently the decking perimeter is the two brick piers, see below for my plans.


2: also planning an open "Hampton style" pergola that will cover the 18sqm decking, which will be attaching to the alfresco (approx. 2300mm above planned decking) so much stronger footings required (see the above pictures, the 4 deeper footings which are offset from the deck footings will be supporting the pergola, I'm not sure on minimum required depth but I will probably attach the posts to stirrups which will be secured in the footings.
3:A second smaller decking approx. 2.8 sqm in size from the laundry exit which will be anchored from the brick wall and require some footings, however i'm unsure as to the minimum depth for footings.


I called Casey council who recommended talking to a surveyor, but am I better to talk to a builder? and I am unsure about having plans made up professionally, at least for the decking and pergola and I haven't worked out how much materials will cost yet but if I am able to build everything myself I would like to save on costs where I can.
thanks heaps
- Mark as New
- Bookmark
- Subscribe
- Mute
- Subscribe to RSS Feed
- Highlight
- Report Inappropriate Content
Re: Low level Deck project
Yeah I know exactly what your saying, ill just be hanging the 90x45's, thanks!
- Mark as New
- Bookmark
- Subscribe
- Mute
- Subscribe to RSS Feed
- Highlight
- Report Inappropriate Content
Re: Low level Deck project
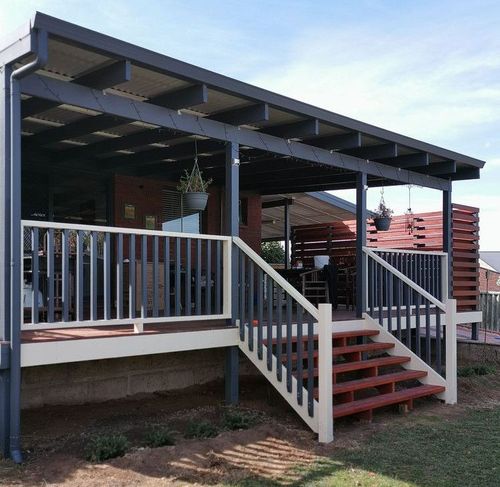
it's been a little while since my last post, I thought I would share some more progress on my project!
I cant remember if I mentioned that I added some steps but if I didn't then here they are, one on either side for a gradual transition into the future paving


and the end result👌


Now with that part completed, I was able to get started on the next part, like the previous deck, I found it really easy and convenient to build the frame in my garage, then once the ground work was completed, and since the frame wasn't too large and heavy, I could easily bring it outside without having extra stuff in the way.

Using a few scrap pieces of timber, I was able to prop the frame in the desired location and attach the posts to the frame, essentially suspending the deck while the concrete was setting.
(I got lucky this time round and found out my friend could score me a post hole digger for a few days, so I went to town! I saved my back and several hours work!)

The fact I could just unscrew the deck frame from the posts and move it so I could backfill the holes and level out the ground was awesome, just sped things up a lot.

The ground was covered with weed mat and the deck was treated with a layer of protectadeck...something I overlooked on the previous one but if I really want to go through the hastle I can always unscrew the merbau and do the same treatment.

...And just like before I added a step to match!

Decking is a slow and steady craft, and I took as much time as I needed to get every angle perfect!


I may have had a couple of round-about ways of doing things but for a result that I really want, I am willing to put the time in to make it spot on!
expect to see some nice overbuilt garden beds in the next couple of weeks!
- Mark as New
- Bookmark
- Subscribe
- Mute
- Subscribe to RSS Feed
- Highlight
- Report Inappropriate Content
Re: Low level Deck project
Hello @TimGeo
Thank you very much for that update, your decking project looks perfect. Those deck steps look good and will look even better once you have your pavers in place. Will you be doing a full paving layout, or will you be just doing a paving path?
Just a friendly reminder not to forget to include drainage when you are drawing up you plans for paving.
We look forward to seeing your next update.
Eric
- Mark as New
- Bookmark
- Subscribe
- Mute
- Subscribe to RSS Feed
- Highlight
- Report Inappropriate Content
Re: Low level Deck project
I will be doing a bluestone paver path and backfill the surrounds with a river stone or something similar, I haven't decided what yet, I am also very fortunate that where the pavers are going, slotted pvc pipe runs the length of the pathway to a pit, so drainage will not be an issue!
- Mark as New
- Bookmark
- Subscribe
- Mute
- Subscribe to RSS Feed
- Highlight
- Report Inappropriate Content
Re: Low level Deck project
Hi @TimGeo
It's good to hear that you've got drainage already in place. Please keep us updated with your progress, we look forward to seeing the layout of the bluestone pavers.
Eric
- Mark as New
- Bookmark
- Subscribe
- Mute
- Subscribe to RSS Feed
- Highlight
- Report Inappropriate Content
Re: Low-level deck and pergola project
Hello @TimGeo,
Let me also congratulate you on your terrific low-level deck and pergola project. It's been great to see your progress.
I wanted to check if you have any updates to share with us regarding your bluestone pavers? This has been a popular project among our members and I'm sure we'd love to see the final look you created.
Akanksha
- Mark as New
- Bookmark
- Subscribe
- Mute
- Subscribe to RSS Feed
- Highlight
- Report Inappropriate Content
Re: Low-level deck and pergola project
Thank you for you kind words, I actually had made a new post to share my semi completed project, and spent a lot of time typing it out only to accidently cancel the post while previewing it when i was almost finished, and lost all my hard work😅 so I got a little annoyed and demotivated. I haven't had a chance to come back to it and start it again but I have attached photos of the finished product here, but I will try motivate myself to write up the project and share it
A couple of things had happened here, I constructed my garden beds while I was clearing the road base out and removing clay and junk back down to the desired level, it was a total construction site for several weeks doing this between work hours!


I had completely re levelled the ground and compacted all of the road base back to the height I needed the ground to be, I went a little over the top on road base, but it was only because I had so much there already and I just used most of it up which was great cos I didn't have a lot left over !
The form work was the easiest part of the job, the most annoying thing was my batteries would die before I could even cut a whole sheet of ply into 100mm strips so it just took longer than I had hoped, but I got it all done so that's the main part, and I kept all the pieces to re-use when I start the other side

Concrete pour was my far the most difficult and back breaking job, not only was access an issue, but I had to shovel in from the middle out because I didn't want to roll over on the form and damage it or break a peg and mess up my levels, I did put reinforcement mesh inside each paver too!


Laying down the first paver was exciting, I just put a couple pices of scrap merbau underneath to see where it would sit, it turned out to be the correct thickness to raise it to the height of the string line, and with the paver at the finished height I was able to visualise to end result and see how well my planning went!

The whole path laid down with mortar , it took a couple of days as I was going through mortar and slurry slowly as to not waste materials, I went back to them and filled the gaps as best I can afterwards to have no risk of pavers being broken on the corners due to there not being any mortar supporting underneath!

The two garden beds I built were covered in merbau before filling the voids, I'm glad I did this because it would have been harder to do it after filling with soil.

I ordered soil from my local supplier, plus surplus for the veggie patch out the back, wheelbrrowing this stuff was so easy after pavers, it was extremely satisfying rolling over the pavers, and the wheel not getting stuck or falling between the gaps, I was super thrilled at the sturdiness and the feel of the pavers, confidence level has definitely gone up!
I purchased the dwarf variety of mondo grass because the regular variety would be too tall and cover the pavers too much, and I want a tidy appearance.
In order to save a little bit of money, not that it was noticable in the grand scheme of the project, I split the tubes of grasses up into two or three bunches and spread them out evenly, the result is smaller plantings but in 2 to 3 years I hope 80% of the space will have filled out nicely!

And finally! Crushed rocks for filling in the space, I intentionally filled soil to aprox 40mm below the paver height so I could fill the rest with rocks, the choice of landscaping rocks come down to affordability, had I went with black river stones the cost would have been absurdly high! 12 bags of these black crushed rocks was a bargain and when they are wet the colour is so nice, everything about the selection was right, the colour, the size, and the price!


I put some poly pipe and drip line in the garden beds for when the irrigation gets hooked up with a timer but for now they are just in place and not being used.
Here is the side as of today, I planted some seaside daisies and some other daisies for now, and hopefully they take off and fill out nicely

Right now. I've started purchasing timber for the Alfresco deck extension, I will be building the frame in a few weeks hopefully and digging the holes for the posts, it has been a while since I posted and I had intended to come back to post my finished product earlier.
Anyway, I will hopefully post some more progress soon, thanks for taking the time to visit my thread 😁
- Mark as New
- Bookmark
- Subscribe
- Mute
- Subscribe to RSS Feed
- Highlight
- Report Inappropriate Content
Re: Low-level deck and pergola project
Great result @TimGeo.
Thanks so much for taking the time to share your handiwork. I'm sure it will help and inspire other members.
Please remember for next time that the site automatically saves drafts of your posts. You can recover the drafts from the bottom of your member profile page. Sorry that you thought you had lost your work - I can understand how frustrating that would have been. Please don't hesitate to reach out to me anytime you need a hand getting the most from the site.
Jason
- Mark as New
- Bookmark
- Subscribe
- Mute
- Subscribe to RSS Feed
- Highlight
- Report Inappropriate Content
Re: Low-level deck and pergola project
I had been typing up for a few days, and coming back to add or edit frequently before posting, and actually did loose my work, because I went to preview so I could review the post and instead of pressing exit preview, I pressed cancel😵
- Mark as New
- Bookmark
- Subscribe
- Mute
- Subscribe to RSS Feed
- Highlight
- Report Inappropriate Content
Re: Low-level deck and pergola project
Hello @TimGeo
Thank you so much for the update. That walkway looks awesome! The pebble size you've chosen fits perfectly with the large pavers and as you mentioned the colours look fantastic when wet.
Again, thank you so much for sharing such a wonderful project.
Eric
Why join the Bunnings Workshop community?
Workshop is a friendly place to learn, get ideas and find inspiration for your home improvement projects
You might also like


We would love to help with your project.
Join the Bunnings Workshop community today to ask questions and get advice.