
The Bunnings Workshop community can help with your home improvement projects.
- Bunnings Workshop
- >
- Discussion
- >
- Garage and Shed
- >
- Fixing water ingress issues in garage
Fixing water ingress issues in garage
- Subscribe to RSS Feed
- Mark Topic as New
- Mark Topic as Read
- Float this Topic for Current User
- Bookmark
- Subscribe
- Mute
- Printer Friendly Page
Share
- Mark as New
- Bookmark
- Subscribe
- Mute
- Subscribe to RSS Feed
- Highlight
- Report Inappropriate Content
Fixing water ingress issues in garage

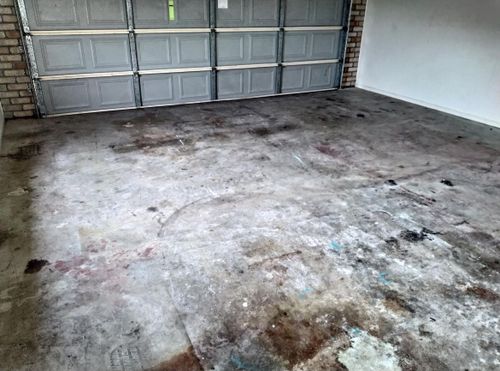
After Retrofitting the garage to be a Libary I had water entering the room, as in a LOT of water when it poured rain. This is the story of how I fixed the water issue.
There were a few places water was entering the room:
- First was the window channels were blocked on the forward facing window, Fixed by opening up the weap holes.
- Second was the patio drained towards the edge of the wall that the garage is attached to. Fixed by caulking the hole that you could see at the edge of the patio.
- Third is the earthworks required to remove the coalwash, clay, soapstone and soil from the wall and allow the wall to breath and dryout.
I was going to attempt to only dig out a shovel or two widths of soil from the wall to find the cracks/holes I suspected was in the brickwork
Materials
100mm PVC DWV 1 of
88 deg right angle PVC fitting
Slotted and Sleeved 100mm Ag-Pipe
Tools
Concrete Cutter
Steps
Step 1
I had to excavate up the side of the garage as this was where I suspected water was entering through the brickwork/cracks.
It is always interesting what you discover when digging things up...

The area that I suspected water was entering the garage via fine cracks in the mortar of the bricks.

Top down look. The pavers are from the sewage pipes being replaced a few months before. and were only temporary.

The reason why... So glad I had carpet tiles down in the garage!

For some reason I didnt think it was going to be a lot of work, something I would knock over in a day or two.

I had eight of these from builders backfill that I dug up...

I had planned on throwing the soil I dug up here. That plan didnt last long as I realised how much I would have to shift.

Yep, cursing the original builders. All they did was create pockets for water to stay/run through and then leach through the wall. The white plastic against the brick work is what they used for waterproofing years ago. The house was built in 1968
Step 2
Pipes and I are attracted to each other is all I can say... I knew it was there and still managed to hit it. I also thought it was going to be deeper then it was. Live and learn.

There she blows! and yep I did shout that. I really thought it was a little deeper.

To give an indication of how big the "ding" was

Turned the water off and finished digging it out in preparation for the plumber to fix. And yep this was just before new years eve... Was doing well 

Old pipe on the left (thin walled that they shouldnt have used when they originally put the water to the house) and the new pipe on the right. The wall thickness difference is huge!

Just part of the soil that Ive been removing.

Good soil, poor soil and clay/shale rock as you move down the driveway...

Slowly getting there, making sure I miss that pipe...

Time to transplant the money tree

More water but less then before entering the garage... (After another downpour)

The large pit is the area I will build a retaining wall to keep the soil off the garage wall, the trench behind that is where the water pipe will be re-run. Behind that the PVC pipe is the sewage pipe that was redone 6 months before.
Step 3
It took awhile to dig out the area I was going to pave and build a retaining wall. I decided to make it big enough for a pathway to go under the house one day so thought to do the job once and not have to redo it at a later date.

A better view of how things will be re-routed. The ground is almost at the correct level to capture the water.

The pile is getting larger.

I had my builder mate come out and cut across my driveway. I was not confident of doing a tidy job and did not want to have to "fix" a mistake I could make. The foundation of the house is also just under the slab and we could not cut into it.

Cut and cleaned out. Was a LOT easier then I expected. Tho the depth was limited.

More rain...

So you can see the two lines of bricks at the base that are damp/wet. This is where the water is getting into the garage I suspect. I need to get the ground level, then waterproof and then get the drainage done.

Sigh, still getting into the garage but less again.
Step 4
I had to connect the new stormwater pipe to the existing stormwater pipe that was somewhere on the right of the driveway. (The stormwater pipe came out on the r/h side of the driveway at the gutter.) I knew there was the gas line into the house somewhere and was extra cautious of that.

Foundation found... and Gas pipe found!

Being very cautious excavating around the gas pipe.. I really was cautious.

Sketch of what I was thinking it would look like and how I was going to do it.

The connection to existing stormwater pipe and ideas on how it would go.

Waterpipe re-routed

Worked it out! 100mm pipe into the pit then down the pit to the existing 90mm old stormwater pipe that goes into a terracotta pipe... The piece of gas pipe sticking out was from when they installed it i'd say. (the plumbers would have run it in and then come back later to connect it.)

100mm pipe installed on a bed of gravel. It goes under the steps and off to the right next to the new gabion wall is.

Covered in gravel and happy!

The deeper cut into the soapstone is for the drainage pipe (Ag pipe plus silt sleeve) the long piece of pvc pipe is the old stormwater pipe that is blocked and doesnt carry water. It goes into the garden bed then ???

T piece installed to go to a slotted drain and the other part is for the sleeved pipe. It is sitting on the foundation concrete.

I kind of cheated by shortening the slotted drain but keeping the grill. This was to allow for the T piece to connect to the drain and extend into the gravel bed area.

Stretchy stretchy. It was so easy to install I was surprised.

The pieces went together very easily, even tho it was a tight situation.

Top down look to show what I was doing with the ag-pipe and sock.
Step 5
The last stage was covering it all and making sure it worked well. Also waterproofing the bottom side of the brickwork.

Waterproofing the bottom two courses of brickwork plus other areas in the corner. (Double bricked area)

I waterproofed the top of the second row of bricks and also the foundation line up two rows of bricks. Its a very sticky bitumen. Do not get it on clothes or hands! lol

Putting gravel in to cover the ag pipe and area around the drain.

Overfilled in areas but the pavers will be at the same level as the grill.


Pavers fit perfectly. By chance! When we cut the concrete it was "here or here" as we pointed at the ground It worked out so well.

I laid the pavers direct on the 8mm gravel, and tapped them level with a mallet. You can just see the white pipe. I had maybe 5mm clearance between the pipe and pavers at one point.

It came up a dream. The pavers have not settled in any place in over a year.

Another storm rolled through. No water inside the garage and no water pooled here!

Drained freely. Was pretty excited.

All done! Stormwater issue is resolved. (Had three very large rain instances in the past year and no water entry into the garage)
- Mark as New
- Bookmark
- Subscribe
- Mute
- Subscribe to RSS Feed
- Highlight
- Report Inappropriate Content
Re: Fixing water ingress issues in garage
Hi @Dave-1
I had no idea this much work went into it. That bypass with the agi-pipe and link up with the drains is fantastic. Then the pavers fit perfectly at the front, what luck! I'm glad that the water is no longer entering your library. This will stop any possible growth of mould and mildew in the space. I suggest running a dehumidifier during winter to prevent moisture getting trapped in your library.
Thank you for sharing such a wonderful project.
Eric
- Mark as New
- Bookmark
- Subscribe
- Mute
- Subscribe to RSS Feed
- Highlight
- Report Inappropriate Content
Re: Fixing water ingress issues in garage
Thank you, Surprisingly the garage/libary stays cool in summer and warm in winter Humidy dosnt seem to be a problem possibly because the ceiling in the garage is actually rafters from the florr above so allows air flow? Its something I do keep an eye on as I have a lott of books in there So lucky I should buy a lotto ticket! and of course when I told my builder mate about it being lucky his resoning was "skills" he had the skills plus lol
Dave
Why join the Bunnings Workshop community?
Workshop is a friendly place to learn, get ideas and find inspiration for your home improvement projects
You might also like


We would love to help with your project.
Join the Bunnings Workshop community today to ask questions and get advice.