
- Bunnings Workshop
- >
- How To
- >
- How to renovate a timber deck
How to renovate a timber deck
Share
- Subscribe to RSS Feed
- Mark as New
- Mark as Read
- Bookmark
- Subscribe
- Printer Friendly Page
- Report Inappropriate Content

Difficulty: Intermediate
A timber deck is an easy and effective way to enhance your outdoor lifestyle space. But what happens when your old deck needs some serious repair work? You don’t need to call in the experts – a deck renovation can certainly be a D.I.Y. job.
If your deck is still in good condition and just needs oiling, check out our simple guide How to restore a deck.
Steps
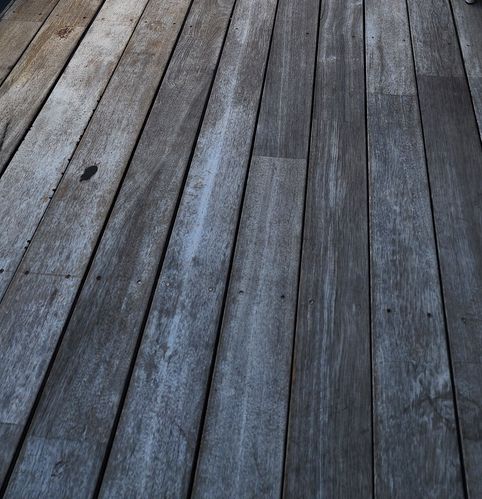
Step 1
A deck like this with rotting slats and dangerously damaged balustrades is in desperate need of work.
Remove any fences or rails that may obstruct your work but do leave any in place as required for safety. Starting from one end of one edge start removing old decking. For hardwood you may need to hammer the bar under before prying up.
When demolishing and rebuilding always wear ear, eye and hand protection. And as you’ll be walking on open joists (possibly at height) take care to prevent falls. We retained sections of decking to serve as platforms until we had new decking laid to work from.


Step 2
Inspect the top of all existing bearers and joists to ensure they are sound and rot-free. Check any posts that will be retained to make sure they are sound and secure. Thoroughly clean the top of bearers and joists to remove any loose material. Inspect any bolts that may be attaching your deck to walls and posts. Lightly sand and surfaces you plan to paint and then apply at least two coats of paint. You’ll find this easier than trying mask around decking boards later.

Step 3
You can fix your decking down in a number of ways and the type of fasteners you select can vary by decking type. For example:
- Galvanised helical threaded nails (often called screw nails) resist deck board movement.
- Climacote Philips #2 drive screws - this type of coating (or similar Class 3 minimum) is required when using ACQ treated timber.
- Stainless steel square-drive decking screws - use stainless steel around saltwater pools or near the ocean.
If you use hardwood decking or have hardwood joists you’ll need to pre-drill for every nail or screw. It’s also recommended to always pre-drill when using stainless steel decking screws as they are more inclined to break under drilling stresses.

Step 4
Treated pine decking is generally reeded on one side. This is often mistakenly thought to be for extra grip. The reeding is designed to go on the underside. This helps prevent cupping and also maximises airflow over joists preventing moisture build-up that may otherwise lead to rot. Leaving it face up can in-fact lead to rot as dirt and moisture collect in the grooves and stays damp.

Step 5
Starting from the end of an outside edge secure your first board. Boards must always be secured to at least three joists to prevent bending. Cut to size accordingly. For smaller decks you may be able to use continuous lengths without needing to have joins. Avoid having joins in a straight line, so first board run may be longer board on left and shorter on right and then the opposite for the next run.
It is important to sink a screw or nail on either side of the board to stop the board from ‘cupping’ up.


Step 6
As you lay each board you need to ensure there is adequate space between them as well as between walls and posts. This is to allow moisture and dirt to drop through but also to give the boards room to shrink and expand with temperature and humidity. It’s important that you keep these spacings equal along the length of the board and across the entire deck. A gap of around 5mm is pretty typical. You can use a tool such as a chisel, provided you have a couple of the same size, or you can buy deck spacers.

Step 7
Always pre-drill on ends to avoid splitting, with treated pine decking this is likely the only time you’ll need to pre-drill. If however you are using hardwood decking or have hardwood joists you will need to pre-drill for every fastener.

Step 8
Cut handrail panels to size. To ensure panel appearance is balanced remove equal lengths from either end. For example, if you need to reduce panel width by 80mm take 40mm from either end. Slide brackets onto all ends, position panel, use 50 or 75mm screws to secure one top end, check level, secure other top end, check panel is plumb and screw-off bottom brackets.

Step 9
Clean down decking and oil or treat with product of your choosing. Clear or natural oils are ideal for enhancing colour and grain of most hardwoods. Treated pine can be sealed with clear oil or use a tinted product to mimic other wood colours. Select a water-based decking ‘oil’ as you’ll find them much easier to work with and clean up.

Step 10
On one end of our deck we decided to construct a raked privacy screen. This used the existing balcony posts and then a new post was added against the house wall. Timber was salvaged from the removed deck, cleaned and then painted with the same paint as the posts. This was an economical way to provide privacy and add a retreat feel to the deck.
Now you are finished you can enjoy the deck again. A little work takes your old deck from off-limits to a relaxing, chill-out zone that’s also perfect for entertaining friends and family.


Materials
- Decking boards (we used 90 x 22mm ACQ treated pine decking boards)
- Decking oil or sealer (we used Cabot’s Aquadeck)
- Suitable decking nails or screws
- Exterior paint for posts (we used Dulux Weathershield low-sheen)
- Fence panels (we used 2400 x 900mm black, flat-top aluminium and brackets)
- Exterior grade 50 or 75mm hex-head timber screws (for handrail brackets)
Tools
- Crowbar
- Hammer
- Drill-driver with bit for pre-drill and screwing
- Spacing tool
- Paint tray
- Decking paint applicator
- Nail gun with exterior nails
- Paint brush or roller
Images


You must be a registered Workshop community member to comment. Please join Workshop or sign in to join in the discussion.
Why join the Bunnings Workshop community?
Workshop is a friendly place to learn, get ideas and find inspiration for your home improvement projects
You might also like


We would love to help with your project.
Join the Bunnings Workshop community today to ask questions and get advice.