
The Bunnings Workshop community can help with your home improvement projects.
- Bunnings Workshop
- >
- Discussion
- >
- Bathroom and Laundry
- >
- Re: DIY Laundry reno
DIY Laundry reno
- Subscribe to RSS Feed
- Mark Topic as New
- Mark Topic as Read
- Float this Topic for Current User
- Bookmark
- Subscribe
- Mute
- Printer Friendly Page
Share
- Mark as New
- Bookmark
- Subscribe
- Mute
- Subscribe to RSS Feed
- Highlight
- Report Inappropriate Content
DIY Laundry reno
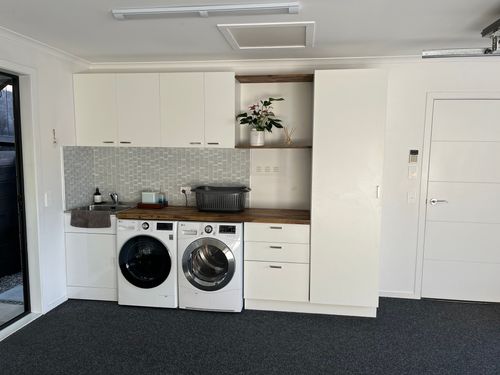
Hi there - so my laundry reno which started out as "I'm going to paint the cabinets, add new handles and tile a new splashback" has morphed into "We're getting new floortiles, splashback, cabinets, sink, tap and counter..." We are on a very tight budget so it will be mostly DIY.

I know what I want the finished product to look like, and I have made steady progress up to now. All wall tiles & floor tiles have been removed. I'm working on removing the tile adhesive from the floors to get it smooth for the waterproofing and new tiles - if you look closely on the left, you can see the bit that I have been working on smoothing (I know I will have heaps more questions about this stage and prepping for tiling).
But now I want to remove the old cabinets and benchtop - so I need to get the sink and mixer out. I am stuck on the pipes though. Can someone please advise how I would stop the water? I'm thinking of turning it off at the mains, but how can I then "stop" the water in these pipes, or tie it off?


Any and all advise will be greatly appreciated. I'm completely new to this, but a quick learner, and not afraid of powertools 
Thanks,
Chris
- Mark as New
- Bookmark
- Subscribe
- Mute
- Subscribe to RSS Feed
- Highlight
- Report Inappropriate Content
Re: DIY Laundry reno
Hi @ChristineM.
Other members of the community might like also contribute their opinion but I don't believe that needs to be plastered where you are tiling. I'd tile straight over that area as it looks sufficiently smooth to not be an issue. Just make sure when you lay your adhesive you screed it flat with a wide toothed trowel. Obviously you'll need to plaster the surrounding area where you are not tiling.
Let me tag @redracer01 to see if they also would be comfortable with you tiling over that area.
Mitchell
- Mark as New
- Bookmark
- Subscribe
- Mute
- Subscribe to RSS Feed
- Highlight
- Report Inappropriate Content
Re: DIY Laundry reno
Hello @ChristineM
The rougher the better. The rough texture will give the tile adhesive more to hold on to.
- Make sure to use a level to be sure that the tiles are all nice and flat.
- Give the tile adhesive time to dry. Grouting too early will trap moisture behind the tile and will not give you a secure hold.
- Do pre-calulation of the number of tiles you need and a pre layout. Setting the tiles out on floor without glue to pre determine position and layout.
- Mix only what you need. Don't mix the whole bag. You may find that you will have to stop or something else might grab your time. A small mix and steady tilling will prevent waste.
- Make sure to tell houshold no entry to laundry while glue is drying!
- Make sure to have a steady breeze running through to get uniform drying.
Thats about it. Goodluck stay safe.
Cheers!
Red
I am a Bunnings team member. Any opinions or recommendations shared here are my own and do not necessarily represent those of Bunnings. Visit the Bunnings website for assistance from the customer service team.
- Mark as New
- Bookmark
- Subscribe
- Mute
- Subscribe to RSS Feed
- Highlight
- Report Inappropriate Content
Re: DIY Laundry reno
@redracer01 you are a legend, thank you so much for that. Super excited to start on this next phase
- « Previous
-
- 1
- 2
- Next »
Why join the Bunnings Workshop community?
Workshop is a friendly place to learn, get ideas and find inspiration for your home improvement projects
You might also like


We would love to help with your project.
Join the Bunnings Workshop community today to ask questions and get advice.